GitHub
Introduction
The GitHub deployment method commits the generated static site to a GitHub repository. You can use the repository as a deployment artifact, or serve it with GitHub Pages when the repository and branch are configured for Pages.
Use this method when you want each publication represented as a GitHub commit.
This deployment method supports:
- Deployment to a GitHub repository;
- Hosting the deployed site using GitHub Pages;
- Retaining specific pre-existing files or directories in the target repository;
- Custom commit messages with publication and deployment placeholders.
Preparation
Before you can utilize this deployment method, there are several key steps you need to complete.
1. Create a GitHub account
If you don’t already have an account on GitHub, start by setting one up. Visit GitHub’s website and sign up. This account will be your gateway to managing repositories, collaborating, and deploying your projects.
2. Create a GitHub repository
Once your account is active, create a repository that will store the static version of your WordPress site. For guidance on creating a repository, refer to the Create a repo guide available in the GitHub Docs.
The configured branch should already exist. If the repository is completely empty, Staatic can initialize it with a placeholder README.md commit before deploying the generated site.
3. Generate an access token
Creating a personal access token involves these steps:
- Sign in to GitHub, then head to your settings.
- In settings, go to Developer settings > Personal access tokens > Fine-grained tokens.
- Click Generate new token for Staatic plugin permissions to access your GitHub repository.
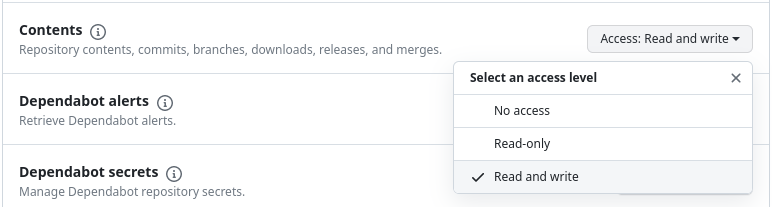
- Name your token for recognition and link it to the appropriate repository. Grant Read and write access under Contents in Repository access (automatically gives Metadata read-only permission).

- After selecting permissions, generate and securely store the token, as it will be hidden post-creation.
Use this token to authenticate and connect the Staatic plugin with your GitHub repository in WordPress, enabling automatic updates and deployment of your static site.
Configuration
In order to configure the GitHub deployment method, head over to the WordPress Admin and click Staatic > Settings > Deployment. Choose GitHub as the deployment method and make sure the following fields are entered correctly.
How Deployment Sync Works
GitHub deployments are synchronizing deployments. Staatic lists the files in the configured branch, writes the generated files under the configured prefix, and removes files under that prefix that are no longer part of the latest build unless they are retained.
Staatic updates the branch reference through the GitHub API after creating the commit. Avoid using the same branch for manual changes while Staatic is deploying, because concurrent branch changes can be overwritten by the deployment update.
Authentication
You can authenticate with GitHub using either a personal access token, a token generated by an app, or a token provided through the environment.
GitHub Token
For authentication with GitHub, if you’re using a personal access token or a token generated by an app, it’s important to enter this token here. This specific token enables the Staatic plugin to securely manage and update your site’s static version in the repository.
Alternatively, the token can be provided by setting the GH_TOKEN or GITHUB_TOKEN environment variable.
The token needs permission to read repository metadata and read/write repository contents for the target repository.
Git
This section outlines how to configure Git settings for storing and managing your static site’s data.
Repository
Specify the Git repository where your static site’s data will be stored. The format for the repository name should be OWNER/REPO. For example, staatic/wordpress-site or staatic/staatic.github.io. This is where your site’s data and changes will be tracked.
Branch
Indicate the branch within the Git repository where commits should be made. Typically, this is the main branch, but it can be any branch you choose to manage your site’s updates (e.g., main or gh-pages).
By default, Branch is set to main.
If the repository or branch cannot be found, deployment fails. For a new repository, create the branch before deploying or leave the repository empty so Staatic can initialize it.
Commit Message
Define a standard commit message for updates applied to the repository. This aids in tracking changes and maintaining a clear project history. For instance, you might use Deployment {shortId} as a template, where shortId will be replaced with an identifier for each deployment.
By default, Commit Message is set to Staatic deployment {shortId}.
Supported placeholders:
| Placeholder | Replaced with |
|---|---|
{shortId} |
Short deployment identifier. |
{id} |
Deployment ID. |
{publicationId} |
Publication ID. |
{buildId} |
Build ID. |
{deploymentId} |
Deployment ID. |
{userId} |
WordPress user ID associated with the publication, when available. |
Prefix
If desired, set a directory prefix to store the static site’s data within a specific subdirectory of your repository, such as some/subdirectory. This is useful for organizing your project, especially if your repository hosts multiple components or versions of your site.
Staatic synchronizes files below this prefix. Files outside the prefix are not part of the deployment cleanup.
Retain Files/Directories
This feature allows you to specify certain file or directory paths that should remain unchanged during the deployment process. These paths can be absolute, or relative to the established repository prefix. List each path on a separate line.
By default, Retain Files/Directories is set to README.md.
Note: any existing files in the target repository that are not included in the build process or not listed here will be automatically removed during deployment. It’s crucial to specify all essential files or directories you wish to retain.
Relative retain paths are resolved below the configured prefix. Absolute retain paths are resolved from the repository root. Retain matching is prefix-based, so use precise paths when similarly named files or directories exist.
Examples
- A repository
README.mdfile. - Key website files like
favicon.ico, orrobots.txt. - Verification files for various search engines or services, such as those for Bing, Google, Yahoo, etc.
Troubleshooting
Handling rate limit exceeded errors
When deploying your WordPress site as a static version on GitHub, you might encounter an error message like Rate limit exceeded during deployment of.... This issue arises due to GitHub’s REST API rate limits being exceeded, which can happen if your publication has a large number of changes.
GitHub can also reject very large repository tree listings. If the recursive tree response is truncated by GitHub, Staatic cannot safely determine which files should be deleted and deployment fails.
To circumvent this issue, especially during the first import, manually deploying your site is an effective solution. Here’s how:
-
Download publication files:
- Navigate to Staatic > Publications in your WordPress admin.
- Locate and download the desired publication as a zip file.
-
Prepare for manual deployment:
- Extract the zip file to a directory.
- Open a terminal or command prompt and change to this directory.
-
Initialize a git repository:
- Execute
git initto initialize a new Git repository.
- Execute
-
Add the remote repository:
- Link to GitHub with
git remote add origin https://github.com/myusername/myrepo.git(replace with your details).
- Link to GitHub with
-
Commit and push the files:
- Run
git add .to add all files. - Commit using
git commit -m "Initial commit". - Run
git branch -M mainif your local branch is not already namedmain. - Push with
git push -u origin main.
- Run
This manual process helps bypass the API limits for the first upload. Subsequent updates, typically smaller, should work fine with Staatic’s automated process.