Custom Domain
Introduction
By default, every site hosted on Staatic Cloud is accessible via a subdomain provided by Staatic, which has the form of [site-identifier].live.onstaatic.com.
Custom domains allow you to make your site accessible via your own, non-Staatic domain (for example www.example.com or docs.example.com).
Note: To set up a custom domain for your site, you need to be able to add DNS records to the domain’s DNS zone.
An active custom domain is also required for Origin Rules that forward paths of your site to your own server.
Adding a custom domain
To add a custom domain name to your site, follow these steps.
- Go to app.staatic.com and log in with your account details.
- Click Account > Sites. Then click on the View Icon next to the relevant site.
- On the Site tab, enter your domain under Connect Your Domain and click Connect domain.
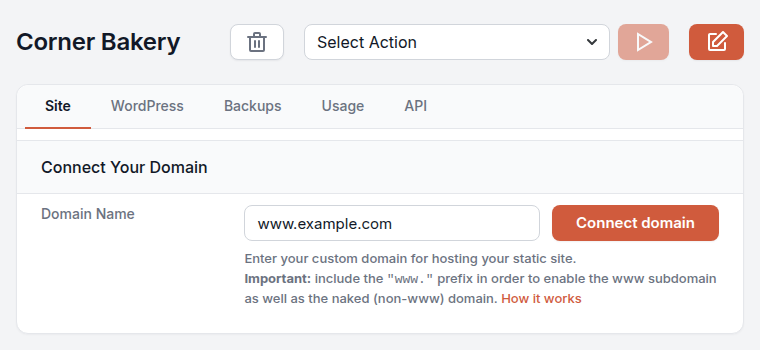
Note: make sure to include the
www.prefix in the domain name you enter if you want your site to be available on both the apex domain and thewww.subdomain. After adding your custom domain you will be able to choose the preferred domain for your site.Note: make sure that the chosen domain name does not have a
CNAMEDNS record pointed to an Amazon CloudFront distribution, e.g.something.cloudfront.net. If it does, Staatic is unable to provision your site.
Once the domain is saved, the Site tab shows the DNS records to add, under Status. To change the domain later, click the Edit Icon next to the site and change the Domain Name.
Set up DNS to validate SSL
To verify ownership of the domain, add the CNAME records listed on the Site tab to the domain’s DNS zone. The procedure for adding DNS records depends on your DNS service provider.
Once the DNS records have been added, it may take up to 30 minutes before the Status changes from Pending to Active.
Set up DNS to resolve the domain
As soon as domain ownership has been verified and an SSL certificate has been issued for the domain, the Site tab shows the additional DNS records that need to be added to the domain’s DNS zone.
Once these records have been added, the custom domain is ready and will resolve to your static WordPress site.
Note: it may take up to 2 hours before your site is accessible everywhere.
Special case for apex domains
An apex (also referred to as root, or naked) domain is a custom domain that does not contain a subdomain, for example example.com.
Apex domains on Staatic Cloud require the use of ALIAS, ANAME or flattened CNAME DNS records in order to function. Unfortunately, not all DNS providers support such record types. If your DNS provider does not allow you to set ALIAS, ANAME or flattened CNAME records, we recommend switching to an alternative DNS provider that does support such record types.
Here is a non-exhaustive list of established DNS providers that are supported.
Set up domain redirect behavior (recommended)
If you have added a custom domain starting with www., Staatic makes your site available on both the root domain (e.g. example.com) and the www subdomain (e.g. www.example.com).
You may choose to redirect traffic from the www subdomain to the root domain or vice versa to prevent your site from being accessible from two locations. The path segments of the original URL (e.g. /category/article/) will be preserved while redirecting.
To choose a domain redirect behavior, follow these steps.
- Go to app.staatic.com and log in with your account details.
- Click Account > Sites. Then click on the Edit Icon next to the relevant site.
- Choose a behavior from Domain Redirect Behavior within the Connect Your Domain section and click Update Site.